 Question from Marla: My trusty old HP laptop finally quit on me the other day so I’ve been shopping around for a new laptop.
I noticed almost immediately that MacBooks are more expensive than comparable Windows laptops. And they aren’t just a little more expensive either. The MacBooks seem to be at least double the cost of similarly equipped Windows machines. My question is why are people willing to pay so much more to buy a MacBook when they can get a comparable Windows laptop for so much less? Rick’s answer: That’s a great question, Marla. And as it turns out, there are several answers, not just one. Here’s a list of the most common reasons why many folks buy Mac computers instead of Windows PCs: 1 – A consistent user experience Unlike Windows, new versions of macOS tend to look and operate a lot like previous versions. Yes, Apple does make changes and enhancements to macOS at times, but the visual changes are usually relatively subtle. Someone who last used a Mac five or six years ago can easily start using a new Mac right away without having to learn new ways of doing things. This is especially true of the various settings available on a Mac. While certain settings change over time and new settings are added, the changes to the menus are so minor that the user will usually know exactly where to look for a setting they’re interested in tweaking. Compare that to Microsoft’s habit of moving important settings to entirely new locations in the operating system and you’ll understand what I mean. 2 – Reliability and stability of the hardware and software Windows runs on an amazing variety of hardware platforms, and it runs better on some of those platforms than on others. Issues with hardware drivers often cause several types of problems for Windows users that Mac users rarely have to deal with. Unlike in the Windows world, Mac hardware is pretty much standard in the sense that macOS knows what to expect after it’s installed on a machine. That seamless compatibility between hardware and software makes for a (mostly) issue-free user experience. 3 – Software updates that (almost) always work flawlessly As you probably know, Microsoft just can’t seem to get a handle on the Windows update process. Truth be told, it’s fairly common for newly installed updates to cause issues ranging from system instability to total boot failure. With extremely rare exceptions, that simply doesn’t happen in the Mac world. While there are occasional glitches with macOS updates, most of them are relatively minor and they are quickly patched. What’s more, it’s rare indeed that an update goes so far off the rails that the machine won’t even boot up to the desktop. 4 – Long-term, reliable software support Apple generally does a much better job at supporting older versions of macOS than Microsoft does with Windows. While they do eventually drop support for older, woefully outdated versions, their product life-cycles typically last several years. 5 – Higher resale value Older Mac hardware that’s still in good condition can usually be sold for more than enough to make it worth your while. Compare that to Windows machines which tend to become virtually worthless in regards to resale value in a relatively short period of time. Of course you’ll never be able to sell a used Mac for enough to replace it with a new model, or even anywhere near it. But Apple hardware almost always sells for enough to make a good down payment on a new machine. 6 – Smooth and seamless integration with other Apple products and services Apple has designed their hardware, software and services to work together in a seamless and (mostly) glitch-free environment. iPhones, iPads, Macs and other Apple devices work generally perfectly with iCloud and the company’s other services., and Apple’s hardware devices tend to work extremely well with one another. 7 – Superior branding and marketing Think back to the last TV commercial or print ad you saw for a Mac (or any Apple device for that matter). It looked pretty sharp, didn’t it? Apple devices of all kinds have an excellent reputation for quality with the public, and that’s always reflected in Apple’s ads and other marketing endeavors. The old saying “You get what you pay for!” sticks in the minds of consumers, and it tends to carry even more weight with loyal Apple customers. Well, that pretty much wraps it up. I’m sure there are other reasons why Mac users prefer those machines over Windows PCs, but I believe these are the biggies. If you have a different reason for preferring Macs over PCs I’d love to hear about it. Feel free to contact me! And by the way, my answers were in no way meant to disparage Windows PCs. They certainly have their place in the world and they are often superior to Macs for specific uses and in many situations. Truth be told, I own several Windows PCs myself, including my primary work computer which is running Windows 11. But you asked a great question and I (hopefully) gave you my best answer. I hope this helps, Marla. Best of luck with whichever new laptop you end up purchasing!
1 Comment
 Carol gets much more spam phone calls on her phone than I do. While I get some, I mostly get weird text messages that I block and/or Delete and Report as Spam.
There are some settings on your iPhone that may be able to help with the spam calls. They are cleverly hidden away in Settings, Apps, Phone. Trust me, it’s there, it’s just hard to find. There are 3 sections in particular, Caller Identification, Screen or Silence Unknown Numbers, and Filter Unknown and Spam Calls. There are some more things after that, as well, but these are three good ones to look at. These work on the newer iphones running IOS 26. One option is when a call comes in from an unknown caller the caller will be prompted to provide their name and reason for the call. Then the phone will ring through and you can decide whether to answer. As per usual, I am including a link HERE, that you should read FIRST, before doing what I do and jumping in blind. When I checked my phone, the first setting was already done, but you should check all these settings and decide if you want to turn them on and remember how to turn them off in case you don’t like some of them.  By BD Bondy
Over the years I have setup hundreds of computers. Up until a couple of years ago I would also add a few things I thought were useful, like CCleaner and Malwarebytes, and I’d change some settings that I thought were helpful. These days I generally don’t do that and leave that stuff to the user. I read a good article though on some things o disable on your Windows 11 computer that I think make a lot of sense. Anything you can stop from running will help performance, and Microsoft, along with everyone else, installs pretty invasive processes when they can. In some ways it can help you, like by giving you better searches, but in other ways it can be quite invasive to your privacy. Since by using all this technology we are giving up quite a bit of our privacy anyway, I accept the tradeoff, but when it effects performance, that is just too much. There are some things that you can do to help balance things out, and this article is worth the read. https://www.pocket-lint.com/windows-services-i-disabled-for-performance-boost/ It lists 5 things to start with, and it’s easy enough to do. The first one is about sending data to MS. Your computer will send some data no matter what, but you might as well limit it when you can. Disabling Remote Desktop Services is a very sensible switch to turn off, unless you are actually using it. It’s a definite security hole if you do not use it at all, and most of us don’t. The third option has to do with spreading MS updates around on your internal network of computers at home. That might be good if you have multiple PCs at home that periodically are updating, but c’mon, really? How many folks have multiple PCs running in our homes? The fourth has to do with Xbox. I’ve never used my PC for that, ever. Neither has Carol. The only game I like is Stupid Zombies 2, and that’s a standalone game. The fifth option is to turn off all the AI on the PC. This will likely appeal to most people. While I am still trying it out, I can see why a lot of us might not be interested in allowing MS and its AI to invade our PCs. The article suggests using a free third-party program to remove, call Flyoobe. You may remember that I wrote about using that program to UPGRADE from windows 10 to 11. Apparently, it has some other features. Read the article and decide for yourself. 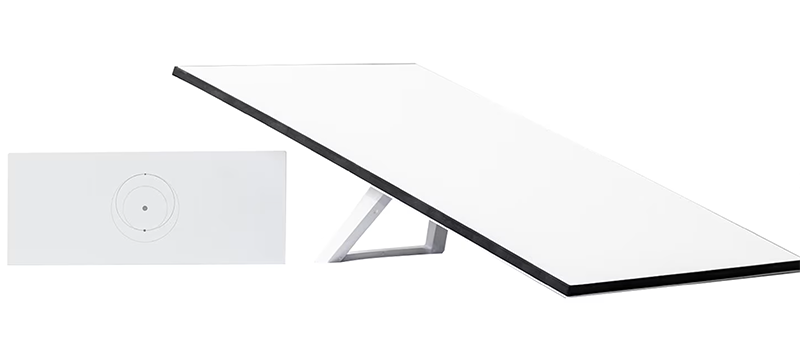 By BD Bondy
I’ve written about Starlink before, and I know a lot of folks aren’t happy with E.M. However, as I’ve said, if you knew the CEO of all the companies you bought from, you probably wouldn't. So, all I can say is that Starlink provided us with the fastest, most trouble free, reliable internet service we’ve ever had. That said, they were very expensive. Lately though, I’ve been getting ads for Starlink where the Residential Lite plan is $49/month, and the hardware is down to $89. I paid a whopping $600 for our unit and thought I’d be able to sell it for half that or so. I ended up giving it to a friend. At these prices, I’m even thinking of getting a backup. We use T-Mobile internet, and it’s good, not great. Good enough for us, fast enough, works way better than Windstream, not as reliable as Starlink, but it’s $30/month, so that was a $90 savings, per month, over what we paid for Starlink. The Residential Lite plan is now $49/month for unlimited data, though the regular Residential plan gets ‘priority’ when and if there’s a heavy usage period. That means the Lite plan may get throttled down. I figure if its regular speed is over 300Mbs and you get throttled down to 50Mbs, you’d still be ahead of the game. Also, there is a roaming option for some of their devices. You can supposedly put it in a backpack, it’s that small. It’s lower power too. There’s a 12v option for it. It’s limited to 50Gb/month, but for roaming, that may be plenty. A lot of RVer's use it. I was thinking of that one for us as well.  By BD Bondy
I got a call from a friend saying he needed to buy a new computer as his 6 year old computer wouldn’t update to Windows 11. After talking to him a bit we decided to try and update his ‘old’ computer first, despite Microsoft saying it could not be done. There are a lot of options for installing Win 11 on non-acceptable computers, and I’ve written about that before. There are just a couple of issues, normally, as to why MS doesn’t allow the upgrade, but they can be bypassed with a few tools. In the case of an update though, that’s something I haven’t been doing. I always wipe the drive and install a fresh copy without keeping any of the user’s data. Then, the old data can be moved over to the ‘new’ computer manually. What I found a couple of days ago is an easy to use free tool that allows you to upgrade your Windows 10 (and possibly older) computer to Windows 11. I’ve only done it one and a half times. I’m in the middle of doing one right now, it isn’t finished. The link to the how to video is HERE: https://www.youtube.com/watch?v=QiMdzZjjwNg He explains the entire process. I suggest watching the video FIRST, all the way through. I didn’t, and it worked out fine, but there is more to it which I recommend. I ran the update as the video went along, pausing it till Windows 11 was installed. Today, I finished the video, and there were a few more things that might interest you. The overall process takes place on the target computer. First, download the FLYOOBE app https://github.com/builtbybel/Flyoobe , I used version flyoobe 1.11, then download a copy of Windows, then unpack the Flyoobe folder and run the Fly0 app. It walks you through how to do everything, though there are some steps to pay attention to. The Flyo app will also walk you through downloading Windows, if you prefer it that way. You answer some questions and then it runs. Watch it until after the screen where it says it will install Windows 11 and Keep everything. After that it runs till it’s done. What should come up then is your computer, now on Win 11. |
Tech TipsThere's a lot of fake information out there. Please be scrupulous about what you share on Facebook and other platforms. Here are some trusted sources. Please don't rely on social media for your information.
Abiquiu Computer Recycling
Abiquiu Computers gives away available computers for FREE. We recover used pc’s and upgrade them, repair them, refurbish them so they may have another life with someone else. CategoriesArchives
October 2025
|
-
Home
- 10/24/2025
- News 10/17/2025
- News 10/10/2025
- News 10/03/2025
- News 09/26/2025
- News 09/19/2025
- News 09/12/2025
- News 09/05/2025
- News 08/29/2025
- News 08/22/2025
- News 08/15/2025
- News 08/08/2025
- News 08/1/2025
- News 07/18/2025
- News 07/11/2025
- News 07/04/2025
- News 06/27/2025
- News 06/20/2025
- News 06/13/2025
- News 06/06/2025
- Criteria for Submissions
- News and Features
- Dining
- Lodging
- Arts
- Bloom Blog
- Classes
- Activities
- Classifieds
- Tech Tips
- Real Estate
- Real Estate by Owner
- Support

 RSS Feed